
How to repair hardwood floors: DIY steps for lasting results
TL;DR:
- Most hardwood floor damage can be repaired by homeowners using the right tools, patience, and proper planning.
- Blending new wood into an aged floor requires matching species, controlling humidity, and sourcing from hidden areas like closets for seamless results.
You walk across your living room and catch a glimpse of a deep scratch running right through the middle of your beautiful hardwood floor. Your stomach drops. Before you reach for the phone to call a contractor, take a breath. The truth is, most hardwood floor damage — scratches, dents, gouges, even the occasional damaged board — is well within reach of a determined homeowner. With the right materials, a bit of patience, and a clear plan, you can restore your floor to near-perfect condition without spending a fortune on professional labor.
Table of Contents
- What you need before getting started
- Step-by-step: DIY hardwood floor repair
- Troubleshooting and avoiding common mistakes
- Comparing minor and major floor repairs
- What most DIY guides don’t tell you about hardwood floor repairs
- Enhance and protect your hardwood floors with expert support
- Frequently asked questions
Key Takeaways
| Point | Details |
|---|---|
| Preparation matters | Having the right tools, materials, and a plan ensures your repair succeeds. |
| Match wood carefully | Use wood from hidden areas for the best color and grain match. |
| Follow proper steps | Clean, fill, blend, and finish repairs thoroughly for seamless results. |
| Avoid common pitfalls | Don’t rush drying time or skip proper prep to ensure a long-lasting fix. |
| Know when to call a pro | Major problems like warping or water damage are best left to flooring professionals. |
What you need before getting started
Good repairs start long before you touch a sanding block. Gathering your tools and understanding your floor’s specific quirks will save you hours of backtracking.
Here in the Bay Area, homes carry some quirks that matter. Older craftsman bungalows in Oakland or Victorian flats in San Francisco often feature narrow-strip white oak or Douglas fir floors that were installed decades ago. The wood has had years to darken and oxidize. Matching that aged tone with fresh lumber off a shelf is genuinely tricky. Humidity swings between foggy coastal weather and hot inland summers also affect how wood moves and settles after repairs.
Before buying anything, review these job preparation essentials to make sure your workspace and subfloor are repair-ready from day one.
Tools and materials checklist
| Item | Purpose |
|---|---|
| Replacement planks | Board swaps for heavily damaged areas |
| Wood filler or putty | Fills gouges, dents, and cracks |
| Sandpaper (80, 120, 220 grit) | Smooths repairs at multiple stages |
| Oscillating multi-tool or circular saw | Cuts out damaged boards cleanly |
| Pull bar and tapping block | Fits tongue-and-groove boards |
| Flooring nails or adhesive | Secures replacement boards |
| Matching wood stain | Blends repair to existing floor color |
| Polyurethane finish | Protects repaired surface |
| Safety goggles, dust mask, gloves | Personal protective equipment |
| Painter’s tape | Protects surrounding boards during finishing |
Always wear your PPE when cutting, sanding, or applying finish. Hardwood dust is a genuine respiratory irritant, and finish fumes in a small room build up fast.
“Matching replacements: Source same species, width, and era wood; borrow from closets for visible areas if needed.” — Fine Homebuilding
Closets are a secret weapon here. Pulling planks from a closet floor and using them in your main living area, then replacing the closet with a close (but not perfect) match, keeps visible repairs invisible. It sounds like extra work, but the result is genuinely stunning.
Pro Tip: Buy 10 to 15 percent more wood than you think you need. Stash the extra in the same room where the floor lives for a few weeks so it acclimates to local humidity. Future repairs will be much easier if you already have matching, acclimated wood on hand. If budget is a concern, check out affordable flooring options that still deliver solid quality.
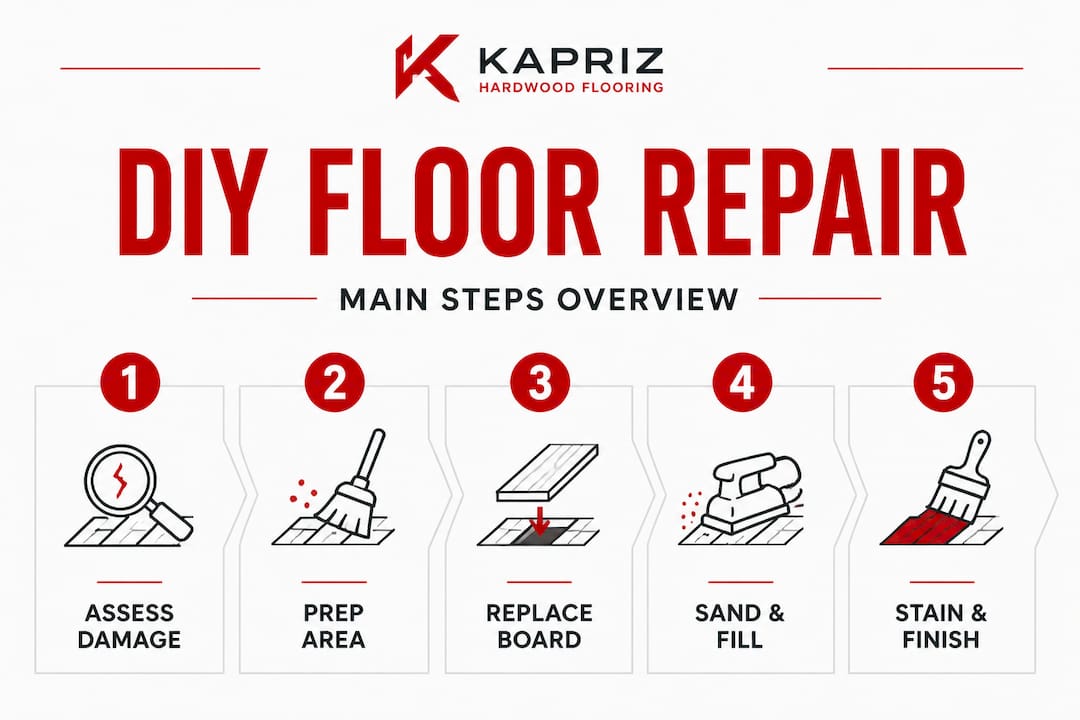
Step-by-step: DIY hardwood floor repair
With your materials ready, you’re set to roll up your sleeves and start the repairs. The steps below cover the full range, from surface-level scratches all the way to full board replacement.
Fixing minor scratches
- Clean the area thoroughly. Use a hardwood floor cleaner, not water. Wipe dry completely.
- Buff lightly. Use a fine steel wool pad (0000 grade) and work in the direction of the grain to feather out the scratch edges.
- Apply matching stain. Use a cotton swab or artist’s brush to dab color directly into the scratch. Wipe excess immediately.
- Seal the stain. Once dry (check the product label, usually 1 to 2 hours), apply a thin layer of matching finish with a small foam applicator.
- Buff when cured. After full curing (24 hours minimum), buff lightly with a soft cloth for a smooth finish.
Up to 90% of visible scratches can be camouflaged with these simple blending techniques, especially on floors with some natural color variation already present.
Filling dents and gouges
- Clean the gouge. Remove any loose fibers, debris, or old wax.
- Choose your filler. Use a latex wood filler for small dents. For deeper gouges, a two-part epoxy wood filler holds up better long-term.
- Apply filler. Pack it slightly proud of the surface (a little above flush) because most fillers shrink as they cure.
- Sand level. Start with 120-grit sandpaper and finish with 220-grit to blend into surrounding wood.
- Stain and finish. Apply stain in thin coats to match, then seal with polyurethane.
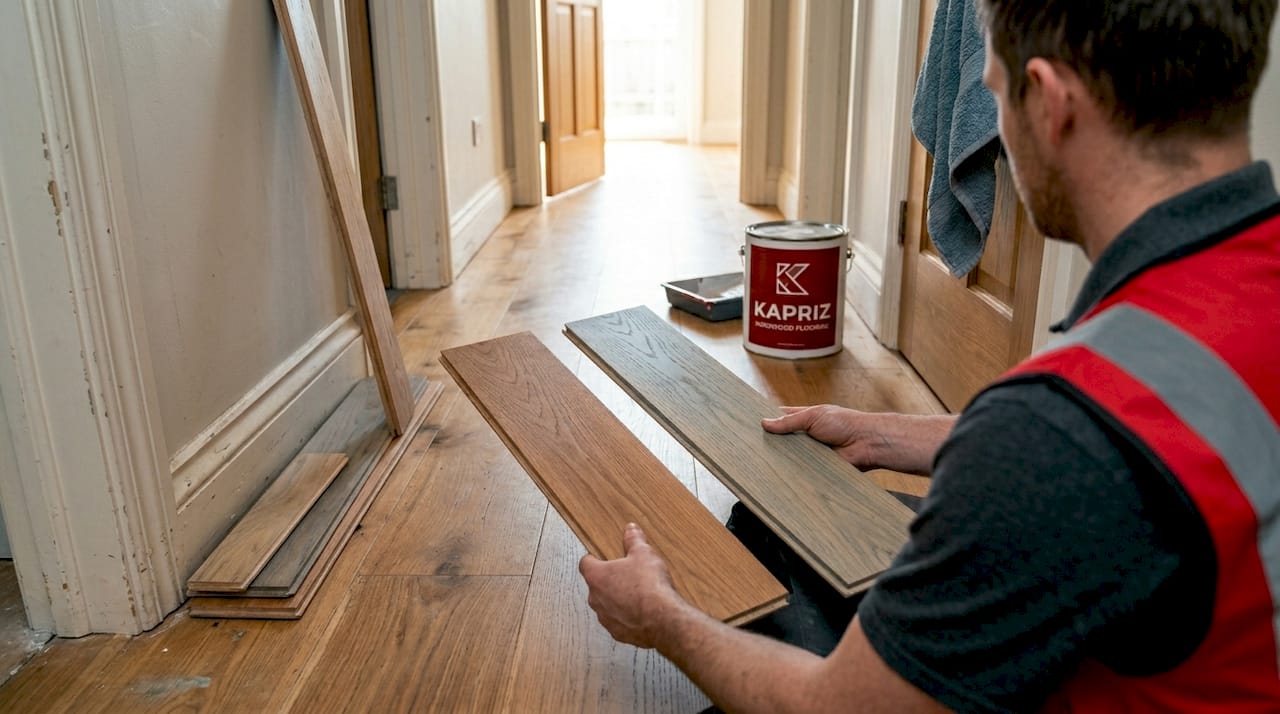
Replacing a damaged board
Full board replacement sounds intimidating, but it is absolutely doable with an oscillating multi-tool and patience. Here is the process:
- Score the board edges with your multi-tool to cut through the finish without nicking adjacent boards.
- Drill a series of holes down the center of the damaged plank to weaken it.
- Chisel out the board in sections, working from the center outward.
- Clean the subfloor. Remove old adhesive or debris. A flat scraper works well here.
- Test-fit the new plank. This is where sourcing from a closet or matching the same species and width really matters.
- Secure the new board with adhesive and/or nails, depending on your floor type.
- Fill nail holes with matching wood putty.
- Sand, stain, and finish to blend with the surrounding floor.
Pro Tip: After applying the final coat of finish, stay off that area for at least 24 to 48 hours. Putting furniture back too soon is one of the most common ways a good repair gets ruined. For guidance on the full finishing process, see our refinishing hardwood floors guide for a complete walkthrough.
Troubleshooting and avoiding common mistakes
After completing the main repairs, it’s vital to sidestep pitfalls and make sure the finished floor is flawless.
Frequent mistakes to watch for
- Mismatched wood species. Oak looks completely different from maple or cherry. Even within species, red oak and white oak carry different grain patterns and colors.
- Skipping the cleaning step. Old wax, oil, or cleaning product residue prevents stain and finish from bonding properly.
- Poor sanding sequence. Jumping from 80-grit straight to 220-grit leaves scratches that show through the finish. Work through the grits.
- Rushing the drying time. This is where most DIY repairs fall apart. Finish that looks dry on the surface may still be soft underneath.
- Applying too much stain at once. Heavy coats pool and dry unevenly, creating blotches that are hard to correct.
Diagnosing specific problems
Color mismatch after staining: The new wood absorbed the stain differently because it is fresher and less porous. Try a wood conditioner before staining, or sand back and blend using multiple thin coats.
Squeaking after board replacement: The new board is rubbing against adjacent boards or the subfloor. A small amount of powdered graphite or talcum powder worked into the joint often solves this without reopening the floor.
Gaps appearing weeks later: Wood is moving due to seasonal humidity changes. This is normal for Bay Area homes. Small gaps (under 1/8 inch) typically close on their own when humidity rises. Larger gaps may need a flexible filler.
Stain not absorbing evenly: Residue on the surface is blocking penetration. Strip, clean thoroughly, and start again.
“Never rush the drying process. Impatience is the number one cause of repair failure.” — Flooring professional consensus
Before committing stain or finish to a main room, always test it in a closet or a low-visibility corner. Reviewing common hardwood floor issues before you start can help you recognize warning signs early. You can also cross-reference your finishing technique with proven DIY refinishing tips to ensure you are following best practices.
Comparing minor and major floor repairs
Once you’ve handled repairs yourself, it’s wise to know where DIY draws the line and when extra expertise is warranted.
DIY vs. professional repair comparison
| Factor | DIY repair | Professional repair |
|---|---|---|
| Scope | Single boards, surface scratches, small gouges | Multiple rooms, subfloor damage, warping |
| Tools required | Basic hand tools, multi-tool | Industrial sanders, specialized equipment |
| Time needed | A few hours to a weekend | Several days |
| Cost | $50 to $300 in materials | $500 to $3,000+ depending on scope |
| Risk level | Low to moderate | Lower with a licensed pro |
| Best result | Excellent for small, isolated damage | Essential for structural issues |
When to DIY vs. when to call a pro
Handle it yourself when:
- The damage is isolated to one or two boards
- Surface scratches cover less than a quarter of the room
- You have matching wood already on hand or can source it easily
- The subfloor is solid and dry beneath the damaged area
Call a professional when:
- You see water stains spreading across multiple boards or rooms
- The subfloor feels soft, springy, or shows visible rot
- Boards are cupping (edges higher than center) or crowning (center higher than edges) across a wide area
- Repeated repairs in the same spot keep failing
Reviewing the signs covered in our guide to when to call a pro can help you make that call confidently. And if you are unsure whether your subfloor is ready, the checklist in preparing your home for repairs gives you a solid foundation.
According to Fine Homebuilding, even professionals rely on the closet swap technique when they need truly invisible results in high-visibility areas. It is not a sign of cutting corners. It is simply the smartest path to a perfect match.
What most DIY guides don’t tell you about hardwood floor repairs
Here is the part most guides skip over: blending new wood into an old floor is genuinely hard, and it is probably the single biggest factor separating a repair that looks invisible from one that looks like a patch.
New wood, even from the exact same species and width, has not had years to oxidize under UV light and foot traffic. It is brighter, tighter, and the pores respond to stain differently. A freshly installed plank of white oak sitting next to a 1940s white oak floor will look noticeably different even after careful staining. The pros know this. That is exactly why the advice to borrow from hidden areas like closets is not a workaround. It is the professional standard.
The second thing most guides underemphasize is subfloor prep. You can do everything else perfectly, and if the subfloor under your new board is dusty, uneven, or slightly damp, the board will move, squeak, or develop gaps within weeks. Take the time to scrape, check for moisture, and ensure the subfloor is flat before setting any new plank.
And then there is patience. We have seen gorgeous repair work ruined because someone put a heavy chair back 12 hours after finishing. Most water-based finishes feel dry to the touch in 2 to 4 hours but do not fully cure for 24 to 72 hours. Oil-based finishes take even longer. Full hardness on a polyurethane topcoat can take up to a month. Light foot traffic is fine after 24 hours, but furniture should wait at least 3 days.
Pro Tip: Label any leftover planks from your repair with the installation date, wood species, stain used, and which room they came from. Store them flat in a closet. When you need another repair in two years, you will have perfectly matched, already-acclimated wood ready to go. It sounds fussy, but it saves hours of hunting and guessing.
For guidance on even blending old and new wood, our refinishing resource covers the nuances of layering color to match aged floors.
The lesson here is that good hardwood repair is not about having fancy equipment. It is about respecting the material, taking time with matching, and not rushing the finish.
Enhance and protect your hardwood floors with expert support
Whether you’re wrapping up a small repair or starting to think about upgrading your floors entirely, having the right products and guidance makes all the difference.
At Kapriz Hardwood Floors, we stock a wide range of Bay Area hardwood floor options that work for every budget, from high-end premium species to solid mid-range choices that look great and wear well. Our team understands what Bay Area homes need, including species that hold up to local humidity, styles that suit craftsman and modern homes alike, and products we genuinely stand behind. If you are considering whole-home wood flooring or just a targeted repair upgrade, we can help you find matching options, plan your project, and get the right materials into your hands without the guesswork.
Frequently asked questions
Can I fix deep scratches or gouges in my hardwood floor myself?
Yes, deep scratches and gouges can be repaired using wood filler and stain if you follow the correct steps for blending and finishing. The key is working through proper sanding grits and applying stain in thin layers rather than one heavy coat.
How do I match new boards to the rest of my floor?
Source boards that match the species, width, and age as closely as possible, and use planks pulled from closets or hidden areas for truly seamless results in main living spaces.
What common mistakes should I avoid with DIY hardwood repairs?
The most common mistakes are poor surface cleaning, mismatched replacement wood, rushing the drying process, and skipping the test-stain step. Always test color first in a low-visibility area before committing to the main floor.
When should I call a flooring professional instead of doing repairs myself?
Call a pro if you have widespread water damage, subfloor rot, or significant warping across multiple boards, since these issues go beyond what surface-level DIY repairs can address.


