
How to spot quality flooring: a guide for Bay Area homes
TL;DR:
- Quality hardwood shows consistent color, grain, and tight milling with no warping or gaps.
- Proper installation and subfloor prep are crucial for long-term durability in Bay Area conditions.
- Engineered hardwood often offers better moisture resistance and value for coastal living.
Imagine paying thousands for new hardwood floors, only to notice squeaks, gaps, and a warped finish six months later. For Bay Area homeowners and investors, that scenario is more common than you’d think, especially when purchasing under time pressure or on a tight budget. The Bay Area’s coastal humidity and high property values make flooring quality a financial issue, not just an aesthetic one. This guide walks you through exactly how to identify, evaluate, and verify quality hardwood flooring before and after purchase, so you protect your investment and avoid expensive regrets.
Table of Contents
- Identifying key indicators of quality hardwood flooring
- Preparing for your purchase: Questions and tools for smarter evaluation
- Evaluating installation methods and craftsmanship
- Verifying durability and value over time
- Our take: What most flooring guides don’t tell Bay Area buyers
- Upgrade your flooring confidence with Kapriz Hardwood Flooring
- Frequently asked questions
Key Takeaways
| Point | Details |
|---|---|
| Check grading and finish | Always verify the manufacturer grade and inspect for uniform color and smooth finish to ensure high quality. |
| Prepare with questions | Arrive ready with a checklist—ask about warranties, certifications, and maintenance for better results. |
| Prioritize expert installation | Professional installation reduces future repairs and helps floors last longer in Bay Area conditions. |
| Monitor long-term durability | Regular post-installation inspections and cleaning routines boost your hardwood floor’s value over time. |
Identifying key indicators of quality hardwood flooring
The first step in avoiding flooring regret is learning to read the signs of quality before you ever bring a board home. Most buyers focus on color and price, but the real indicators go much deeper.
Understanding grading labels
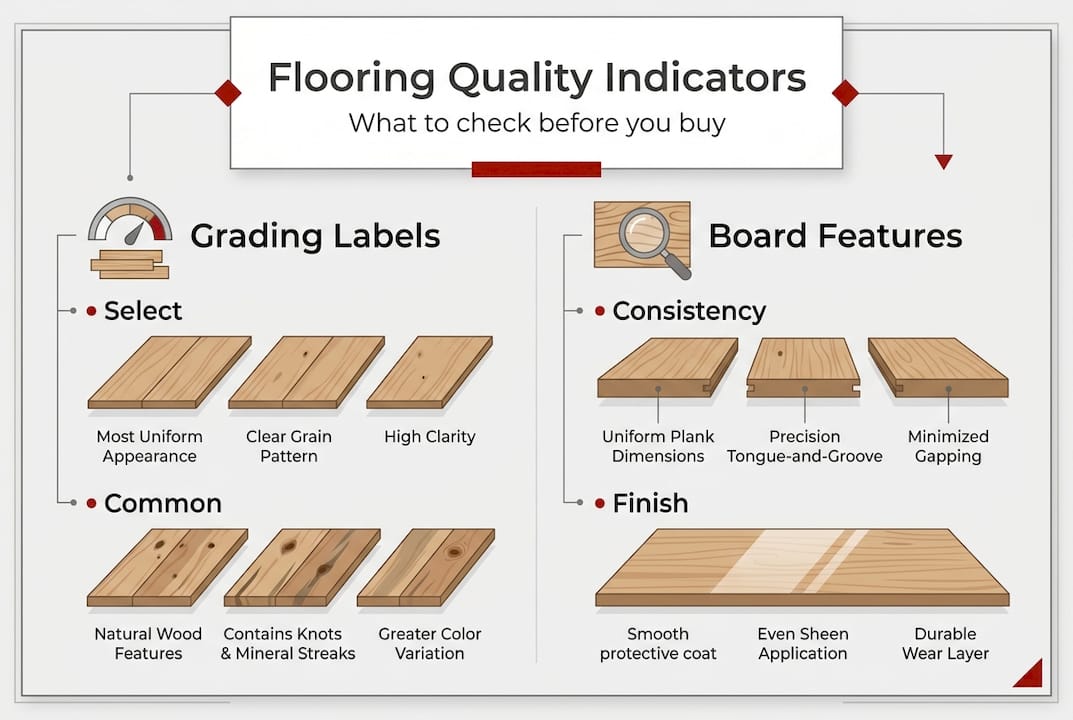
Hardwood flooring is sold in grades that reflect appearance and consistency. There are specific grades and indicators that denote hardwood quality, ranging from “Select” and “Clear” at the top to “Common” grades that allow more knots and color variation. Knowing how to read these labels helps you compare products honestly. The hardwood grades explained by the National Wood Flooring Association are a reliable reference when you’re shopping.
Physical characteristics to check
Run your hand along the board’s surface. Quality flooring feels smooth and consistent, with no rough patches or raised grain. Look for:
- Uniform color and grain pattern across boards in the same batch
- Consistent board width and length with minimal variation
- Tight, clean milling with no gaps between tongue and groove edges
- A finish that reflects light evenly without bubbles or streaks
- No warping, bowing, or cupping along the board’s length
Longer boards generally signal higher quality because they require more careful milling and come from larger, older trees. Short boards with heavy variation are often a sign of lower-grade stock.
Solid vs. engineered hardwood quality
Both solid and engineered hardwood can be high quality, but they have different strengths. Solid hardwood is one piece of wood and can be refinished multiple times. Engineered hardwood has a real wood veneer over a plywood core, making it more stable in humid conditions. For Bay Area homes, engineered options often deliver better long-term flooring investment benefits because they resist moisture-related movement.
| Feature | Solid hardwood | Engineered hardwood |
|---|---|---|
| Refinishing | Multiple times | 1-3 times depending on veneer |
| Humidity stability | Lower | Higher |
| Price range | Mid to high | Budget to high |
| Best for | Dry interiors | Bay Area conditions |
Pro Tip: Always request the manufacturer’s warranty documentation before purchasing. A reputable product will come with a written warranty covering finish and structural integrity. If a retailer can’t produce it, walk away.
When balancing quality and budget, remember that a lower price tag doesn’t always mean poor quality. It often just means a lower grade with more natural character, which can still be durable and beautiful.
Preparing for your purchase: Questions and tools for smarter evaluation
Knowing what quality looks like is only useful if you show up prepared. Preparation is essential to finding durable and affordable flooring, and that starts before you walk into any showroom.
Tools to bring when evaluating flooring
- Moisture meter: Measures moisture content in boards. Quality hardwood should read between 6% and 9% for most Bay Area interiors.
- Tape measure: Verify board dimensions match what’s advertised.
- Sample boards: Bring samples from your existing floor or subfloor to compare thickness and compatibility.
- Flashlight: Useful for spotting finish inconsistencies and checking milling precision at an angle.
Questions to ask your flooring rep
Don’t leave the store without answers to these:
- What grade is this product, and what does that grade allow?
- Is this solid or engineered, and what is the veneer thickness?
- What are the humidity and temperature installation requirements?
- What certifications does this product carry (FloorScore, CARB compliance)?
- What does the warranty cover, and for how long?
Bay Area subfloors vary widely, from concrete slabs in newer builds to old wood joists in Victorian homes. These hardwood buying tips from HGTV reinforce why knowing your subfloor type before shopping matters enormously. A product that works perfectly over concrete may fail over a bouncy wood subfloor.
| Subfloor type | Compatible methods | Key concern |
|---|---|---|
| Concrete slab | Glue-down, floating | Moisture barrier needed |
| Wood joist | Nail-down, floating | Bounce and flex |
| Radiant heat | Engineered only | Expansion gaps critical |
Review the full hardwood install prep checklist to make sure your space is ready before any product is ordered. Ordering the wrong product for your subfloor is one of the most expensive mistakes Bay Area buyers make.
Evaluating installation methods and craftsmanship
Even the finest flooring can fail if it’s installed poorly. Proper installation techniques significantly affect hardwood floor longevity, and spotting shortcuts early can save you from a full replacement down the road.
Signs of quality installation
- Boards are acclimated to the room’s humidity for at least 48 to 72 hours before installation
- Subfloor is level to within 3/16 inch over a 10-foot span
- Expansion gaps are maintained at all walls and transitions
- Fasteners or adhesive are applied consistently without skipped spots
- Transitions between rooms are finished with matching trim pieces
Red flags to watch for
Bay Area buyers should pay close attention to these warning signs during and after installation:
- Boards installed without acclimation, especially in older homes with high moisture
- Visible gaps between boards that appear within weeks of installation
- Squeaking in multiple areas, which often signals inadequate fastening or subfloor issues
- Finish that chips or scratches unusually fast in the first few months
“A floor is only as good as what’s underneath it. Skipping subfloor prep is the single most common reason we see premature flooring failure in Bay Area homes.”
A thorough subfloor assessment before installation is not optional. It’s the foundation, literally, of everything that comes after. For a deeper look at your options, the installation technique guide covers nail-down, glue-down, and floating methods side by side.
Pro Tip: Ask your installer for a walk-through at two stages: once after subfloor prep and again after the final board is laid. This gives you a chance to catch issues before they’re sealed under trim and finish.
The correct installation process outlined by This Old House is a useful benchmark to compare against what your contractor is doing.
Verifying durability and value over time
Installation day is not the finish line. The real test of flooring quality plays out over months and years of Bay Area living. Evaluating flooring performance post-installation is crucial for long-term value.
Signs your floor is holding up well
- No cupping or crowning of boards after seasonal humidity changes
- Finish remains intact and glossy in high-traffic areas after 12 months
- No new squeaks developing in areas that were quiet at installation
- Boards stay tight with no visible gaps opening at seams
Simple maintenance checks every homeowner should do
- Check moisture levels in the room seasonally, especially in winter when heating dries the air
- Inspect finish wear in high-traffic zones every six months
- Look under area rugs periodically to catch uneven wear or discoloration
- Clean spills immediately to prevent moisture penetration into the wood
Bay Area humidity typically ranges from 50% to 70%, which sits at the upper edge of what most hardwood flooring tolerates comfortably. Quality hardwood floors, when properly installed and maintained, last 25 to 100 years depending on species, finish, and traffic. That lifespan drops sharply with poor installation or neglected maintenance.
For homeowners curious about alternative materials that handle humidity naturally, stable flooring materials like bamboo and cork offer interesting comparisons worth exploring.
Know when to call a professional. Minor surface scratches can be buffed out. But widespread cupping, deep gouges, or finish failure across large areas usually means it’s time for a professional assessment, not a DIY fix.
Our take: What most flooring guides don’t tell Bay Area buyers
Most guides stop at checklists. Here’s what we’ve learned after years of serving Bay Area clients that no checklist captures.
The Bay Area real estate market punishes flooring mistakes harder than almost anywhere else in the country. A floor that looks fine in a Sacramento home might fail in a Sunset District Victorian because of fog-driven humidity that cycles daily. That’s not a product problem. It’s a selection problem.
We also see investors and renovators skip professional assessments to save a few hundred dollars, then spend thousands fixing moisture damage six months later. The flooring investment wisdom here is simple: the cost of a proper evaluation is always less than the cost of a mistake at this price point.
Buying quality flooring is not about spending more. It’s about spending right. The best value we’ve ever seen a client get came from a mid-grade engineered product installed with meticulous subfloor prep, not from a premium board rushed onto a bad foundation.
Upgrade your flooring confidence with Kapriz Hardwood Flooring
Ready to find flooring that actually fits your Bay Area home and your budget? At Kapriz Hardwood Floors, we carry a curated selection of products we trust, from accessible options to high-end brands, all chosen for real-world performance in local conditions.
Browse our full range of Bay Area hardwood options to find the right fit for every room. If you’re thinking bigger, explore ideas for full-home wood flooring that creates a seamless, lasting look. And before you buy anything, use our grading reference to make sure you’re comparing products on equal footing. Our team is here to help you make a confident, informed choice without overpaying.
Frequently asked questions
What are the most common signs of poor hardwood flooring quality?
Visible gaps, uneven finish, inconsistent board color, and audible squeaks after installation are top warning signs. These physical indicators reveal flooring quality before problems become costly.
How important is professional installation for flooring durability?
Expert installation prevents long-term issues like buckling and maximizes the floor’s lifespan. Proper installation impacts durability more than most buyers realize.
Which flooring materials hold up best in Bay Area humidity?
Engineered wood and some natural materials withstand Bay Area humidity better than solid hardwood. Material choice affects humidity performance significantly in coastal climates.
Can I verify hardwood quality after installation?
Yes, look for even wear, intact finishes, and stable boards a few months after installation. Post-installation checks confirm long-term quality and catch problems early.


