Replacing a board
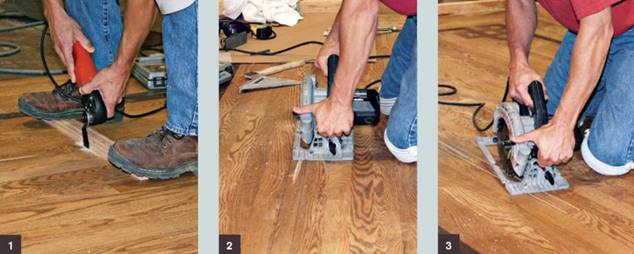
Replacing a board. Particularly with solid wood floors, board replacement isn’t difficult. If you are not taking out the entire board, the first step is to make clean, square cuts at the ends of the board you’re replacing. Guide a razor knife with a square to score the top of the board and prevent splintering, then make the cuts (preferably with a Fein Multimaster tool).
Use a circular saw set just to cut through the depth of the flooring to make two rips down the center of the board. Follow this up with several diagonal plunge cuts that go almost to the board’s edges. These make it easier to break the board into pieces for removal. It’s a good idea to locate nails first using a magnet. Use a chisel to split the board along the cuts. You should now be able to pull the board out in pieces. Be careful not to damage the tongue and groove of the adjoining boards.
Choose a replacement board whose grain is a close match to the surrounding floor. You should have the replace-ment board cut to size before removing the old one. Given time, floors can expand into the void when removing a board. Cut off the bottom lip of the groove of the replacement board, as well as the tongue on its end. Then bevel the bot-tom of the groove’s upper lip to ease placing the board.
Five-minute epoxy is the best choice for gluing the re-placement in place. Glue both edges to keep the board from squeaking. An alternative is a urethane construction adhesive, applied directly to the floor. The downside of using construction adhesive is that the board must be weighted down until the adhesive sets up, (say, overnight). Using a block to protect the new board, tap it down with a hammer.

- Cut the end of the board using a Fein Multimaster tool guided with another board. If you don’t have a Multimaster, it may be easier to remove the entire board.
- Make two parallel cuts along the board with a circular saw set deep enough to reach the subfloor. Make sure there’s nothing on the saw’s base that could scratch the floor, and keep the cuts V2 in away from the edges to avoid hitting nails.
- Make several diagonal cuts along the board, being careful not to cut into adjoining boards.
- Split the board along the cuts with a chisel.
- Remove the board in pieces.
- Cut off the bottom lip of the groove, and then bevel the replacement board along the bottom of the remaining lip so it can hinge into place.
- Epoxy both edges of the board.
- Tap in the board with a hammer and block, and weight it down as needed until the glue sets.
- If necessary, scrape and sand the surrounding boards to bare wood to help blend the new board into the existing floor. Apply a matching stain and refinish.